

Hi everyone, as promised here is my follow on post from post Part 1 of Budget Revit families that covers a list of what I might expect to see in budget Revit content.
My comments below might look like a steep list of considerations but please remind yourself that budget Revit content is usually built to be sold multiple times, for years on end and to a global audience.
All screen grab images below are based on real-life budget family examples that I have sourced from content that is being sold to the public. Please understand that I am not trying to personally attack or embarrass anyone.
SUBCATEGORIES
THE PRIMARY GOAL: Make it easy for your clients to re-use or rename subcategories to their company standard by:
- Being consistent in subcategory naming across all of your ranges.
- Assigning all geometry and line work to a subcategory (Max 3-4 custom subcategories in a family)
- Apply good naming conventions (E.g. no Manufacturer specific subcategories)
- Don’t define one subcategory to represent more than one object type. See example #3 below.
EXAMPLE # 1 – Not assigning geometry to a subcategory.

EXAMPLE #2 – Manufacturer specific subcategories don’t work
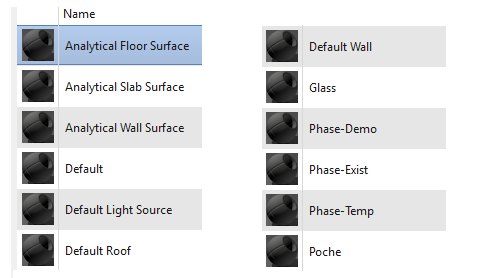
This is an example of how subcategories from content can clutter a project file very quickly. I loaded in several families into a test project and my Object Style menu of subcategories expanded out of control. In a real project situation this amount of imported subcategories would be a big disruption to the project team. That means that all these subcategories would have to be renamed before they could be added to a company library (assuming the company Revit library is well-managed.)
- All of these items could have been placed on 4-5 subcategories (As shown on the right in image below)

I recommend using the ANZRS subcategory list or some other industry Revit subcategory list (regardless of the region that you are creating content for) if helps keep things more consistent in the industry.
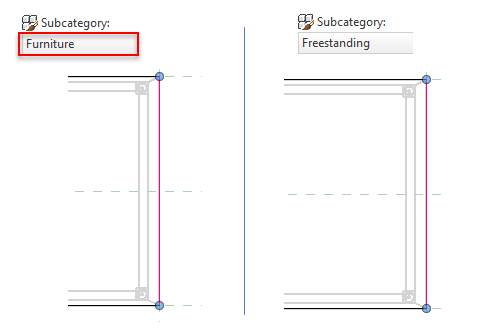
EXAMPLE #3 – A subcategory should not represent multiple object types
Option 1: Assign the bench and stool to separate subcategories in the same or separate families.
[ Left Column = Original subcategory, Right Column = My suggestion ]

Option 2: Place all movable furniture into one subcategory for all your content ranges.
[ Left Column = Original subcategory, Right Column = My second suggestion ]

MASKING REGIONS & SYMBOLIC LINE WORK
THE PRIMARY GOAL: The client should not have to go through your content and assign line work (Symbolic or Sketch) to a subcategory. It can be very time consuming for your client to fix this oversight.
- All Masking region sketch line work and symbolic line work must be assigned to the appropriate Subcategory and not to the Family Category.
[ Left Column = Original subcategory, Right Column = My suggestion ]

MATERIALS
THE PRIMARY GOAL: To ensure that the family already has a material representation as a starting point and to make it easy for the client to integrate your Manufacturer-specific-materials into their library.
EXAMPLE #1 – All geometry in the host & nested families must have a material.

- Use Autodesk materials where it’s appropriate. E.g. If the Autodesk ‘Glass’ material works well then use it, but don’t rename it or make your own custom version.
- Where a Manufacturer-specific product is available in a specific range of colours make the effort to match the RGB values of the shading and basic render colour so that the object colour is aligned with the colour of the actual product.
EXAMPLE #2: Manufacturer’s material naming and colour setting

TIP: I find using a prefix of ‘Z_’, “XX_’ works well because it helps to sort the Manufacturer-specific-materials towards the bottom of a project material list and won’t interfere with company specific materials. I also like putting the manufacturer’s name in CAPS because visually it easy to scan.
Question: What if a Manufacturer’s product comes in too many material options?
- (a) For budget Revit families I think it’s acceptable for the content creator to pre-create 5-8 materials at most. After that your client can add the rest if they wish.
- (b) Or if a product comes in more than 8-10 material options the I think it could be created in ‘concept-white’ but only if this is stated clearly on the family description on the website that the family only has one material, namely white.
- I would prefer option (a) if possible.
EXAMPLE #3 – Unused Autodesk default materials should be removed
- All unused Autodesk materials should be removed from the host and nested family.

Question: What about generic Revit content?
- White works wonders on generic content. (Please avoid using ‘Default’ Grey – it looks awful and it means that your family will need immediate editing before it can be used.)
- It must be clearly stated on the website that the family only has one material, namely white.
EXAMPLE #5: Material as instance or Type parameters
If a family is available in 5 frame colours and numerous fabrics then there would obviously be far too many types to define in terms of variable combinations.

- In example above the family was changes so that the frame colour was a Type Parameter and the fabric option as an instance parameter.
- See my Manufacturers Page on this blog site to understand more about some common pitfalls if you are a Manufacturer reading this post.
LINE PATTERNS AND FILL PATTERNS
- Use the Autodesk default line patterns and avoid custom line patterns.
- Don’t change the names of the Autodesk line patterns.
EXAMPLE #1 – Keep it simple.
[ Left Column = Original line patterns, Right Column = My suggestion ]

EXAMPLE #2 – Remove all unused line patterns from the family.
- Remove all imported line patterns.
- Your clients should not be cleaning your families for you!


TYPE NAMES
- All host and nested families must have a Family Type name defined.
- A Family Type name should never be a repeat of the family name.
EXAMPLE #1: Type name in the Project environment
If a Family Type name has not been defined Revit will simply duplicate the family name as a type name when loaded into your client’s project file. This looks unprofessional.

EXAMPLE #2: Family Type name in the family Editor of a nested family
The sample applies to nested families. Make sure to define the Family Type name of the nested family and double-check the naming in the host family.

COARSE, MEDIUM AND FINE VIEW SETTINGS
- If the Revit family is placed in the Revit project then I believe that it should be visible and occupy some graphical space in all views, regardless of view scales.
- Leave it up to your clients to customize their own Visibility setting preferences over and above the basics of adding detailed elements to only be visible in ‘Fine’ view.
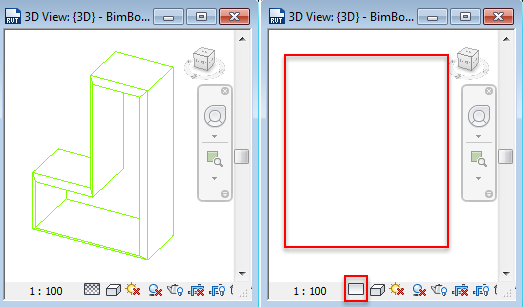
EXAMPLE #1 – No geometry in Medium of Coarse View settings
- It is far more time-consuming for your clients to redefine the visibility if you have adjusted the default visibility settings on every geometry or line work element in your family.

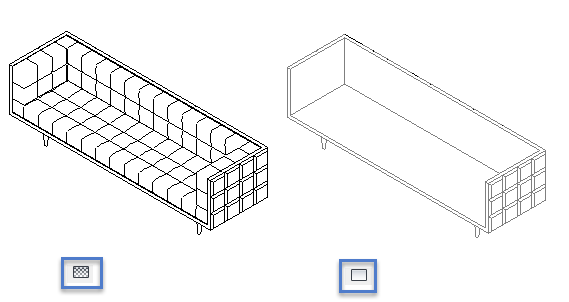
EXAMPLE #2 – Avoid customizing the visibility of the family too much
Be careful of oversimplifying too much. In this example the cushions need to still consume some space in Coarse and Medium views otherwise it will look silly.
DATA INFORMATION
- Define content creator source or contact details as a bare minimum.
- The Revit default parameters should not be used to define content creator information.
EXAMPLE # 1
- Keep the Autodesk URL for product/ manufacturer website information.
- Keep Type comments blank or use it to describe the product but don’t use it to define content creation information.
- Add your own parameters for Content creation information.


REFERENCE PLANES
- Ideally all Reference Planes in all views should be set to 3D in all views unless there is good reason to override a Reference plane to be 2D in a specific view.
- Clean and tidy reference planes are not essential but boy-oh-boy they certainly leave a lasting impression. A clean family that looks planned out and neat makes your client feel that they received value in purchasing your Revit family and that care was taken in making it.

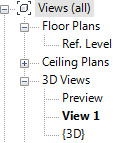
THUMBNAIL VIEW
- Keep to the industry standard of using ‘View 1’ as your thumbnail View in all 3D Revit families.
- Use the default views and their default view names.
- Don’t add extra Views to families. * Exception: Some family templates only have the one {3D} view. If that is the case duplicate the {3D} view and rename it to ‘View 1’ or ‘Thumbnail view’.
EXAMPLE #1 – Adding custom views
- By adding extra views your client may need to delete the view and reset the thumbnail settings. this is unnecessary re-work for your client.

EXAMPLE #2
Please define the Thumbnail preview as part of your final content creation audit.
.
SHARED PARAMETERS
- The wonderful thing about a lot of the Manufacturer specific content is it does not always NEED to be parametric. So only build families to be parametric if its appropriate! See Example 1, below.
EXAMPLE #1 – Is that dimension label really needed?
- E.g. The sofa arm height will not be scheduled out by Interior Designers as a general industry practice. So in this example this parameter label is not required at all because the family is representing a Manufacturer Specific object that should not be built to have this specific parametric functionality.


PARAMETER NAMING
- The parameter naming should make sense.
- Refer to ANZRS for some guidelines is unsure of how to approach parameter naming. This post is not about necessarily following ANZRS standards but there are some checklists and guidelines that you will hopefully find useful.
- Avoid using codes or single letters to define a parameter name. The only exception in my view is structural families where some manufacturer catalogs have dimensions defined specifically by letters or specific code abbreviations.
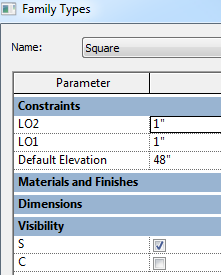
EXAMPLE # 1
- The ‘S’ and ‘C’ parameter below was used in this family to define if the table was a ‘Circular’ or ‘Square’ table.
- The ‘C’ or ‘S’ abbreviation is not immediately obvious to the Revit modeller and it means that the Revit BIM Manager will probably have to rename all your parameters before adding your families to their library.


MAKING A FAMILY MORE COMPLEX THAN IS NEEDED
In the next family you can see that the content creator really meant well. He built all the various options into a single family so that drafters would not have to rotate the family themselves within the project in order to build their unique bookshelf system.
EXAMPLE #1
This is the Revit family that represents the ‘L shape’ of this bookshelf range.

Whilst I admire the content creator’s keenness here I think that the end result is less user-friendly for the client from a content library maintenance point of view. Essentially we have four pieces of geometry (identical in sizing) that represent the same object. So keep your client’s general library maintenance requirements in mind too.
MANUFACTURER PRODUCTS & SPLITTING INTO SEPARATE FAMILIES
Below is example of another real budget family where the family is trying to do too much.

This family was later slit into three separate families by our firm in order to make it usable for our drafting team.

BEWARE OF MAKING ONLY FACE-BASED FAMILIES!
Admittedly the whole debate about whether to use Face-Based or Non-Face-Based families is a controversial subject that I am not going to cover now. But, as a content creator it’s important to realize that some firms use Faced-Based families whilst many will simply refuse to use them.
- So I suggest that you either offer (a) Non-Face-Based families or (b) Face-Based and Non-Face-Based family options for the same object. This an easily be done by nesting the Non-Face-Based version into a Face-Based template. (It means a slightly larger file size but I think the industry will see that you mean well by offering both versions.)
- It is very time-consuming for your client to convert a Face-Based family into a Non-Face-Based family. But it takes 2 minutes to change a Non-Face Based family into a Face-Based Family with simple nesting.
That’s about all I wanted to cover as key features that I would like to see in all Revit content that is being shared or sold to the industry. This is nothing new. ANZRS already covered all of these topics in detail many years ago. We are beginning to see signs of improvement but I would like the improvement to be really noticeable. I hope that the industry will provide more feedback to professional content creators and Manufacturers about the content that they are receiving so that we can all benefit from Revit families that are far less time-consuming to integrate into specific company standards.
NOW, NOW – NO POUTING!
The bottom line as I see it is: Content creators that go the extra mile will sell their content easily, even if it costs a bit extra. Budget content can still be made well and sold repeatedly to justify the effort required to make it. *

I hope that many Content creators find this post useful. I will be doing a review in Part 3 on some budget content that we recently purchased. That will be released in a few weeks time.
If you find a good range of Manufacturer’s Revit content or budget Revit families please contact me – I’d love to know about it ;-)
~ ~ ~
Please click “Like” and Share if you enjoy these blog posts. It makes my day a bit brighter and it helps make it feel like the effort taken to prepare these posts might be worth it ;-)
Take care, Michelle

Pingback: Weekly Roundup – 2015.37 | The BIMsider
Pingback: PART 3 – BUDGET FAMILIES REVIEW | BIM BOOM BAM
Pingback: Weekly Roundup – 2015.41 | The BIMsider